


Telescope Optics for Hobbyists
Authors: Florian Gollier
It can be argued that the field of optics began through humanity’s curiosity with the stars and worlds outside of our own. Telescope-building is one of the oldest uses of optics and has been a practiced craft for many centuries. The past century has seen an increase in the prevalence in telescope-building hobbyists with optical elements becoming more readily available to the public. Building a telescope can be fairly straightforward, and many hobbyists have successfully done so but jumping into this hobby can be a bit daunting. Telescopes are based on the idea of angular magnification. These systems are used to allow the viewer to see objects from afar through their ability to turn an object’s angular field into one that is larger to the viewer. This concept revolves around the idea of matching elements with specific optical powers together in order to change this angular field. Though this seems like it would involve some complexity, the premise is actually fairly simple and makes building a telescope rather simple in itself.

Figure 1: Image of the spiral galaxy M83 taken by the Hubble Space Telescope.1
Telescope Basics
Before getting into building a telescope, there are several factors to consider. As with all things, building a telescope comes with trade-offs, including portability, budget, and performance. Portability is important as the average hobbyist will likely be travelling to find the best viewing spots for their stargazing. Budget obviously plays a role in the quality of the telescope elements. Performance can be relative, as different telescopes perform better for different tasks. Therefore, before jumping into this hobby, it is important to understand and set limitations on all these considerations. It can be easy to go down rabbit holes if a limit is not set on all three of these parameters.
After laying the groundwork, it is important to more deeply understand the basic concepts behind telescopes. It is infinitely more difficult to narrow down which type of telescope to build and the accompanying parameters if one does not understand these concepts. Several types of telescopes will be introduced to aid the beginner hobbyist in making a more educated decision. Specific lists of elements will be shown below to help in guiding the eager hobbyist in choosing the correct components for their ideal telescope. Though the parts suggested below are from Edmund Optics, many of the best components for building a telescope are generally better sourced through hobbyist shops which specialize in such parts.
Focal length and magnification play a key role in creating and getting the best use out of a telescope and therefore must be understood before diving into telescope making. Though these are crucial, there are also other important aspects which are not as often talked about but must be examined.
Basic Concepts
The lens closest to an object being viewed is referred to as the objective lens; this lens works together with the eyepiece to create an image. Focal length helps in determining the magnifying power, or the inverse of the magnification, and f/number of the system. A larger magnifying power can be obtained using the same eyepiece with a longer focal length on the objective optics. To calculate the magnification of a telescope, simply divide the focal length of the objective optics by the focal length of the eyepiece.
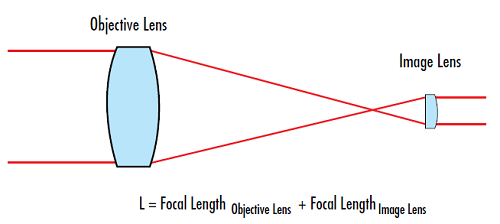
Figure 2: Depiction of magnifying power of a simple telescope system composed of two lenses.
Magnifying power is important in that it allows the object of interest to appear larger than it actually is. Angular magnification increases the angle of the incident light as seen by the viewer in image space, making the image appear larger. Knowing this, it may be easy to simply add an objective with a longer focal length into the system to reach higher magnifying powers. However, this is where the portability consideration becomes important A telescope with a longer focal length, in most cases, tends to get longer to allow the light to focus. Therefore, a longer focal length means a longer telescope, which generally leads to a less portable system. This elongation of the system occurs for most longer focal length telescopes, though there are some which have been cleverly designed to circumvent this by folding the optical path on itself. However, this gives rise to other complexities in the system that will be covered when looking at specific telescope types.
A common quote in the telescope-making world states that “aperture is king.” This is because a larger aperture allows for the ability to gather more light from the object under inspection; this leads to a brighter image, making it easier to view the object. There are also other reasons for this, such as resolution. Given the fact that most telescopes are diffraction-limited, a larger aperture means higher contrast and increased resolution. This then leads to the aperture of a telescope being thought of as a measure of quality for telescopes. One should be careful, however, as large aperture telescopes suffer from the same portability issues as longer focal length telescopes. A 12” diameter objective reflective telescope may seem like a wonderful idea for light gathering and resolution purposes but carrying a 12”diameter telescope tube becomes incredibly difficult. Therefore, as with focal length, aperture size must be carefully examined.
Other Considerations
While focal length, magnifying power, and aperture are key fundamental concepts for telescopes, there are other concepts to understand before one can start gazing up at the sky. To experience the night sky to its fullest, one must consider several parameters like resolution, astronomical seeing, and exit pupil aperture.
Resolution
Typical optical systems are most often assessed through their resolution. While this may not be as relevant to amateur hobbyists who are more often concerned with the cost, size, aperture/focal length ratio, and type of telescope, it does still play a role in astronomy and is important to understand as a concept. Resolution is directly related to optical performance and dictates the size of the details seen by the system. A simple way to understand this is to imagine two stars, or point sources, next to one another. As the stars get closer to one another, the ability of the optical system to clearly identify them is directly related to and dependent on the system’s resolution. The plot below helps to visualize this concept.

Figure 3: When the images of two point sources are closer than their minimum resolvable detail, or the Rayleigh criterion, they blend together and become unresolvable.
In the above image, the two dots and corresponding peaks are the representative images of two point sources. For the imaginary optical system above, if the points were to get closer than the Rayleigh criterion, or minimum resolvable detail, and therefore have a higher frequency or line pairs per millimeter, the two points would be unresolvable. One can therefore see how important resolution is. Stars, or any points of light coming from a celestial object cannot be deciphered from one another with a low resolution. This causes a less enjoyable experience when star-gazing given that the purpose of a telescope is to give crisp images of celestial objects.
Astronomical Seeing
Astronomical seeing is a concept which describes atmospheric conditions and non-uniformity. Optical performance relies heavily on the medium through which light is transmitted. Given that light must traverse the atmosphere to reach the objective of any Earth-bound telescope, the thickness and uniformity of the atmosphere heavily affect the resolution of the telescope. One of the easiest ways to grasp the concept of astronomical seeing is to imagine small, uniform regions of atmosphere called isoplanatic patches. These patches are momentary, on the order of 1/10th of a second, due to wind blowing them across the field of view which causes a decrease in performance from the optical system as the medium traversed by the light is ever changing. This is the major reason for portability being a key factor in making a telescope. There are geographical regions which have considerably better astronomical seeing due to their environments and geographical features. Therefore, being able to carry your telescope to a place with better seeing is incredibly important. Astronomical seeing becomes even more important with larger objectives which, again, heavily impact performance and the need for portability. It is much easier to have a portable telescope which can be taken to a place with better seeing than having a large objective telescope in a place where seeing will significantly hinder performance. The figure below shows that image quality is dependent on the objective diameter, D, relative to the size of the isoplanatic patch with r0 being the radius of each patch affecting the time they are apparent in the optical system’s field of view.
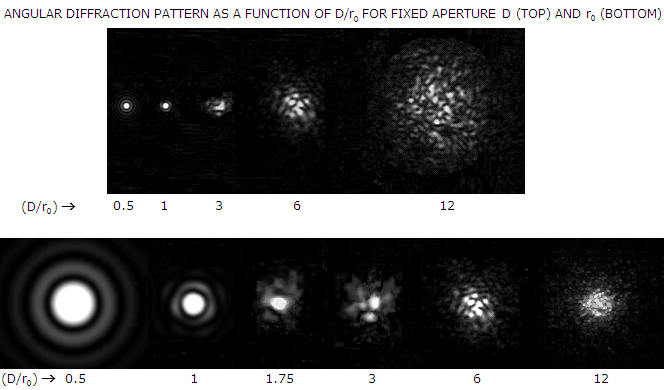
Figure 4: Observing the diffraction patterns of point sources as a function of the objective diameter (D) divided by the size of the isoplanatic patch (r0) reveals that larger objectives experience worse image degradation under poor seeing conditions.
Field of View
The next important consideration is field of view. No single telescope will perform well across the entirety of the star-gazing hobby. Field of view plays is important because different optical systems will be able to view differently-sized objects. For example, a system looking specifically at binary star systems or planets may have a very narrow field of view with a high magnification, but a system designed to look at nebulae will have a much larger field of view and might have a lower magnification. Luckily, field of view and magnification can be changed by using different eyepieces. In fact, it is customary for star-gazing enthusiasts to have several eyepieces with different focal lengths which let them vary the magnification of the system as well as the field of view. The eyepiece will also impact the exit aperture of the telescope which plays an equally important role in showing the viewer an adequate image. A table is shown below with the different relationships between f/number, magnification, exit pupil diameter, and objective diameter.
Table 1: Important Considerations/Specs for Telescope Building.
| Pupil (mm) | Eyepiece FL vs. f/# | Magnification vs. Dobj (mm) | ||||
|---|---|---|---|---|---|---|
| f/4 | f/5 | f/7 | D=100 | D=200 | D=300 | |
| 6 | 24.0 | 30.0 | 42.0 | 17 | 33 | 50 |
| 4 | 16.0 | 20.0 | 28.0 | 25 | 50 | 75 |
| 2 | 8.0 | 10.0 | 14.0 | 50 | 100 | 150 |
| 1 | 4.0 | 5.0 | 7.0 | 100 | 200 | 300 |
| .05 | 2.0 | 2.5 | 3.5 | 200 | 400 | 600 |
In Table 1, different eyepiece focal lengths are shown with their various f/numbers for specific pupil diameters. The eyepiece focal length can be calculated using the following equation:
In the above equation, $ \small{\text{FL}_{\text{eye}}} $ is the eyepiece focal length, $ \small{D_{\text{pupil}}} $ is the exit pupil diameter, and $ \small{ f / \#} $ denotes the f-number.
The second portion of Table 1 shows the relationship between objective diameter $ \left( \small{D _{\text{obj}}} \right) $, pupil size, and magnifying power. The following equation applies to the portion of the table where $ \small{D _{\text{obj}}} $ is the diameter of the telescope objective, $ \small{\text{MP}} $ is the magnifying power, and $ \small{D _{\text{pupil}}} $ denotes the diameter of the objective of the telescope:
This information is especially important when choosing the right telescope specifications because different exit pupil diameters and magnifications are more ideal for the viewing of certain objects. In general, an exit pupil of 4-5mm diameter is ideal for dim objects, 2-2.5mm for general use, and 0.5-1mm for objects which are better seen with high magnification, such as planets. Having the correct exit pupil diameter then shows the different magnifications available given a specific objective diameter, as seen in Table 1.
Types of Telescopes
Having looked into the important considerations involved in building a telescope, one can then establish the type of telescope to build. There are two main categories of telescopes: reflective and refractive. Explanations and suggested bills of materials (BoM) using Edmund Optics® parts for each type of telescope are below.
Refractive Telescopes
Refractive telescopes were the first to be invented. At the time, eyeglasses were readily available, and simply putting two eyeglass lenses with different optical powers together makes a refractive telescope. Over time, the design has evolved but the concept remains the same. The objective lens is the first lens in the telescope and tends to have both a large diameter and a large focal length. Large objectives are used for their light-gathering ability and the large focal length allows for larger magnifications. For these elements, it is key to work with precision lenses which produce little to no aberrations, especially chromatically. After the objective comes the eyepiece which is used to achieve the afocal system that is found in all telescopes. As stated above, different eyepieces are used to view different astronomical bodies. Below is a general diagram of the setup of a refractive telescope.
There are two categories of refractive telescopes: Keplerian and Galilean. A Keplerian telescope consists of lenses with positive focal lengths separated by the sum of their focal lengths (Figure 5).
Figure 5: Refractive Keplerian telescope made with two positive lenses.
A Galilean telescope consists of a positive lens and a negative lens that are separated by the sum of their focal lengths (Figure 6). However, since one of the lenses is negative, the separation distance between the two lenses is much shorter than in the Keplerian design. While using the effective focal length of the two lenses will provide a good approximation of the total length, using the back focal length will provide the most accurate length.
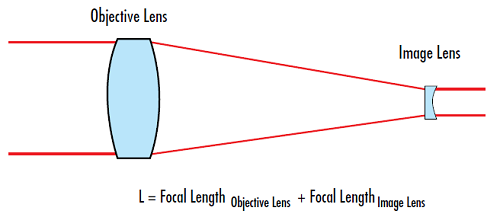
Figure 6: Refractive Galilean Telescope made of one negative lens and one positive lens.
Some advantages inherent to refractive telescopes are:
- The enclosed housing protects the system from environmental/temperature changes.
- Refractive elements tend to have higher resolving power per inch of aperture.
- They are simpler to build and align.
- There are no optical path obscurations inherent in their design.
- Minimal alignment needs to be done.
- Longer focal ratios (focal length divided by aperture size, also referred to as f/number) tend to allow for the use of simpler eyepieces with a longer focus.
There are some disadvantages inherent to refractive telescopes:
- Large, achromatic refractive elements/objectives are very expensive.
- The price gets incredibly high once you pass the five-inch diameter threshold and continues to increase at a higher rate past this mark.
- These telescopes tend to be very long in nature due to the high focal lengths involved and the inability to fold the optical path in on itself.
- Refractive elements suffer from chromatic aberrations.
Below are lists of different configurations which we believe to be ideal for making a telescope with Edmund Optics parts. The first list includes only the optical elements necessary to make the telescope and leaves mounting to the telescope maker. This allows for the telescope maker to tailor the telescope to their own needs which can be important in beginner telescope making. Mounts can be created through 3D printing or bought from vendors who specialize in telescope-based optics mounting methods.
The second list offers several different options for mounting the optical elements to make the most complete version of a functioning telescope from scratch. These mounting methods are not particularly conventional since Edmund Optics no longer carries telescope mounting parts. There are also some parts which Edmund Optics cannot provide, as the company specializes in precision industrial optics rather than specialized hobbyist parts. These components can be easily obtained from third-party vendors.
Optical Components List
2.5” Achromatic Keplerian
| Part | Part Number | Quantity |
|---|---|---|
| 2.5”, 486.3mm EFL Precision Achromat | #42-817 | 1 |
| Edmund Optics Eyepieces | Family ID #2075 | NA* |
These parts result in the following specs:
| EFL (mm) | 486.3 |
| f/number | 7.66 |
| Magnification Range | 17.36-60.79 |
| Coating | MgF2 (400-700nm) |
3” Achromatic Keplerian
| Part | Part Number | Quantity |
|---|---|---|
| 3”, 849.9mm EFL Precision Achromat | #42-817 | 1 |
| Edmund Optics Eyepieces | Family ID #2075 | NA* |
These parts result in the following specs:
| EFL (mm) | 849.9 |
| f/number | 11.15 |
| Magnification Range | 30.36-106.25 |
| Coating | MgF2 (400-700nm) |
4” Achromatic Keplerian
| Part | Part Number | Quantity |
|---|---|---|
| 4”, 1524.7mm EFL Precision Achromat | #50-107 | 1 |
| Edmund Optics Eyepieces | Family ID #2075 | NA* |
These parts result in the following specs:
| EFL (mm) | 1524.7 |
| f/number | 15 |
| Magnification Range | 54.45-190.59 |
| Coating | MgF2 (400-700nm) |
Optical Components and Mounting Options
For a more complete solution, below are potential mounting solutions for the above optical elements. These mounting options are a bit different from conventional telescope mounting options as most telescopes come in a typical “tube” system that block unwanted light sources from leaking into the optical system and causing the image of the object-of-interest to degrade rather intensely. The options below do not include any “tubular” mounting option but it would not be too difficult to find a tube into which to mount the below systems. It should also be noted that when appropriate mounting solutions are not available, custom solutions can be constructed using 3D printing or 80/20 rails.
2.5” Achromatic Keplerian mounting options:
| Part | Part Number | Quantity |
|---|---|---|
| Primary Optic Mounting Option | ||
| Kinematic Mount | #15-867 | 1 |
| Post (2.5”) | #59-753 | 1 |
| Post Holder (2”) | #58-978 | 1 |
| Compact Carrier | #11-163 | 1 |
| Eyepiece Mounting Option | ||
| T-Mount Eyepiece Mount | #52-303 | 1 |
| T-Mount Kinematic Mount | #58-871 | 1 |
| Post (2.5”) | #59-753 | 1 |
| Post Holder (2”) | #58-978 | 1 |
| Compact Carrier | #11-163 | 1 |
| General Mounting Options | ||
| 500 mm Compact Rail | #54-929 | 1 |
3” Achromatic Keplerian
| Part | Part Number | Quantity |
|---|---|---|
| Primary Optic Mounting Option | ||
| Kinematic Mount | #15-868 | 1 |
| Post (2.5”) | #59-753 | 1 |
| Post Holder (2”) | #58-978 | 1 |
| Compact Carrier | #11-163 | 1 |
| Eyepiece Mounting Option | ||
| T-Mount Eyepiece Mount | #52-303 | 1 |
| T-Mount Kinematic Mount | #58-871 | 1 |
| Post (2.5”) | #59-753 | 1 |
| Post Holder (2”) | #58-978 | 1 |
| Compact Carrier | #11-163 | 1 |
| General Mounting Options | ||
| 500 mm Compact Rail | #54-929 | 2 |
| Breadboard | #56-929 | 1 |
4” Achromatic Keplerian
| Part | Part Number | Quantity |
|---|---|---|
| Primary Optic Mounting Option | ||
| Kinematic Mount | #15-869 | 1 |
| Post (2.5”) | #59-753 | 1 |
| Post Holder (2”) | #58-978 | 1 |
| Compact Carrier | #11-163 | 1 |
| Eyepiece Mounting Option | ||
| T-Mount Eyepiece Mount | #52-303 | 1 |
| T-Mount Kinematic Mount | #58-871 | 1 |
| Post (2.5”) | #59-753 | 1 |
| Post Holder (2”) | #58-978 | 1 |
| Compact Carrier | #11-163 | 1 |
| General Mounting Options | ||
| 500 mm Compact Rail | #54-929 | 3 |
| Breadboard | #56-929 | 1 |
These components will allow the amateur telescope maker to create a rail-based telescope. As previously stated, this would most likely benefit from being surrounded by a “tubular” structure to control incident light on the system from external sources. This would also help make the system more resistant to temperature changes. It will also be important to purchase some sort of tripod-like stand which are available from many different sources. Using optical rails will allow the system to be easily implemented onto a tripod with a ¼-20 thread. This would give the telescope maker a full system with which to gaze at the stars.
Reflective Telescopes
Reflective telescopes, as stated earlier, consist mainly of a large primary mirror and a smaller secondary mirror. The eyepiece is then added for ocular viewing in a similar manner to the refractive telescope. The list below contains optical elements only. No mounting options are given as mounting the mirrors for a reflective telescope adds a lot of intricacies. By design, a mirror folds the optical path back on itself. The secondary mirror is used to circumvent this and is placed in the folded optical path. This allows the viewer to see the image from the side of the telescope without obscuring the entire image by standing in front of the telescope. This is shown in the diagram below. This setup is also referred to as a Newtonian telescope.
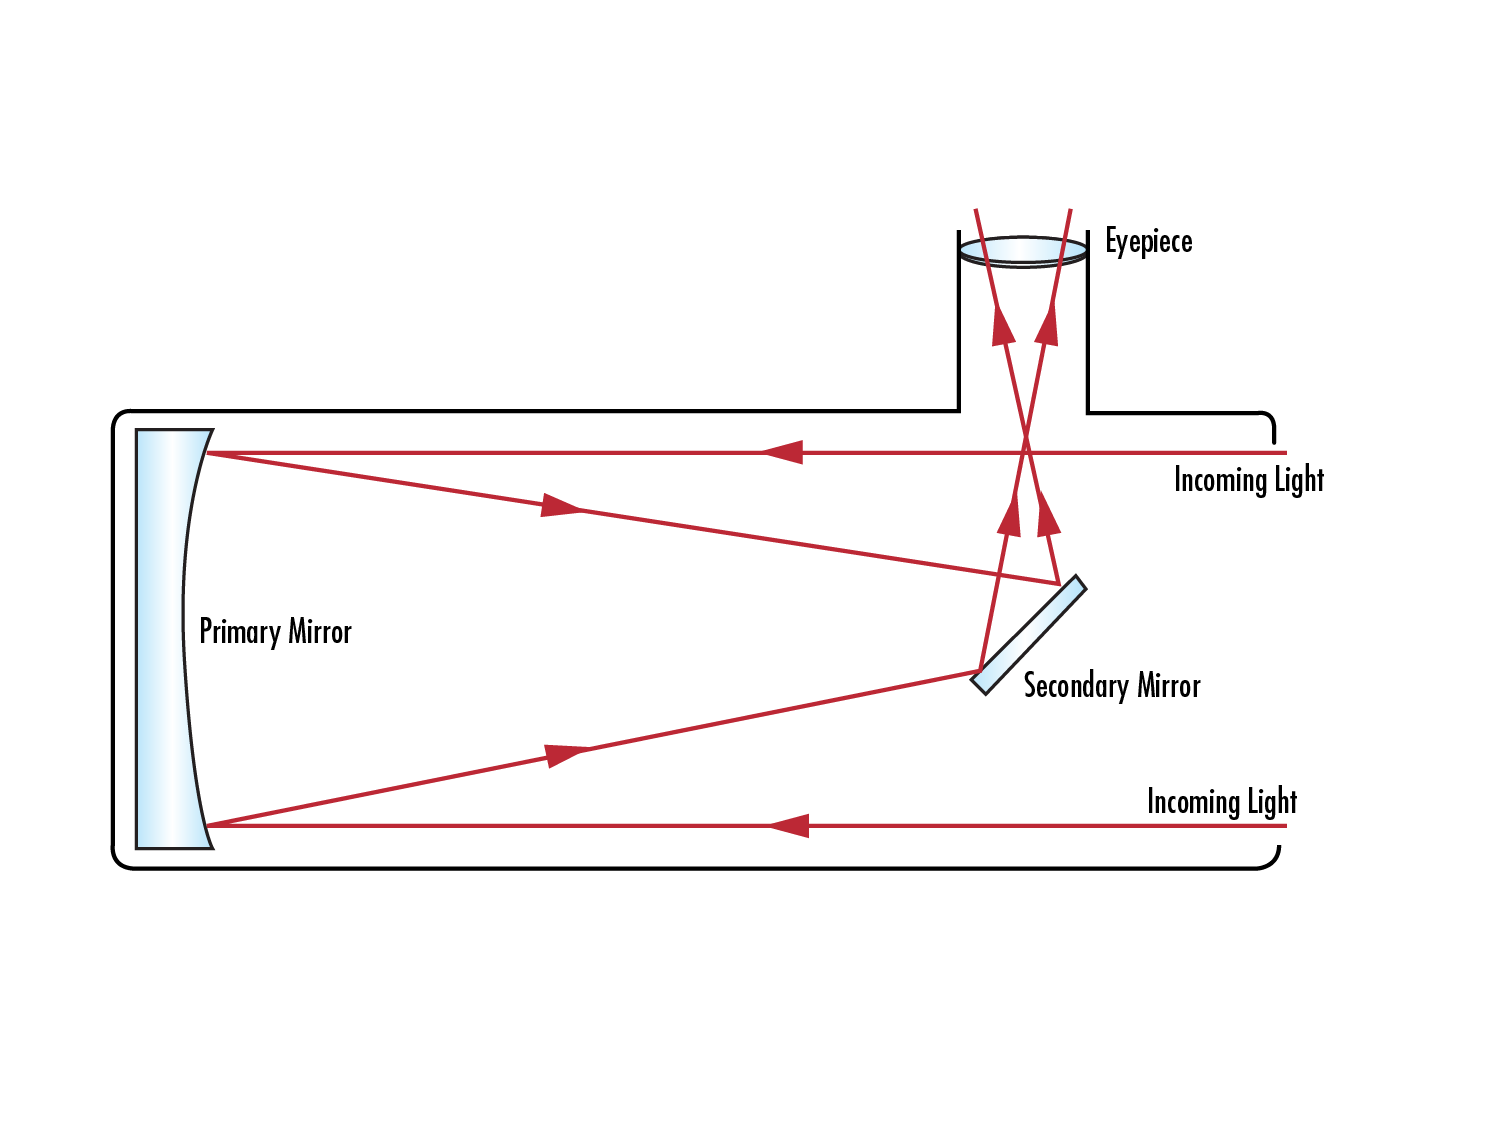
Figure 7: Reflective Newtonian telescope schematic.
However convenient this secondary mirror placement is, it still creates problems as the secondary mirror and its mount will obscure the central portion of the objective mirror. As such, secondary mirror mounts are designed to be as small as possible. Given the nature of the reflective telescope, its applications and uses will be slightly different from those of refractive telescopes.
Some advantages inherent to reflective telescopes are:
- These can more easily incorporate a larger mirror for greater light gathering capabilities.
- There are less chromatic aberrations stemming from the objective. The only chromatic aberration comes from the eyepiece.
- The required optical components have a lower cost.
- They can be more portable due to shorter length and the ability to take them apart because of the optical path length folding.
- It is easier to grind mirrors by hand than to make a refractive lens by hand, which is what contributes to the lower cost.
There are some disadvantages inherent to reflective telescopes:
- They usually have lower imaging performance capabilities.
- Collimation needs to be considered/reset every time these are used.
- If using an open design concept, they are more vulnerable to environmental/temperature changes.
Due to the limited amount of telescope-related optical mounting components from Edmund Optics, mounting options for these primary and secondary mirrors are omitted.
The sizeable nature of the Edmund Optics mount required for the secondary mirror would cause an obscurity and affect the optical performance of the system.
Eyepiece mounts/focusers have been omitted for similar reasons. Given the absence of a mount for the secondary mirror, it is also difficult to suggest a mount for the eyepiece as it is dependent on the position and setup of the secondary mirror mount. The list of optical elements shown below require the telescope maker to either create their own mounts (something which can be done fairly easily through 3D printing or using 80/20 rails) or to purchase them from third-party vendors.
6" Newtonian Telescope
| Part | Part Number | Quantity |
|---|---|---|
| 6”, 914.4mm EFL Parabolic Mirror | #32-071-522 | 1 |
| 1.88” Elliptical Mirror | #30-840 | 1 |
| Edmund Optics Eyepieces | Family ID #2075 | NA* |
These parts result in the following specs:
| EFL (mm) | 914.4 |
| f/number | 6 |
| Magnification Range | 32.66- 114.3 |
| Coating | Protected Aluminum (400-2000nm) |
8" Newtonian Telescope
| Part | Part Number | Quantity |
|---|---|---|
| 8”, 1219.2mm EFL Parabolic Mirror | #32-074-522 | 1 |
| 1.88” Elliptical Mirror | #30-840 | 1 |
| Edmund Optics Eyepieces | Family ID #2075 | NA* |
These parts result in the following specs:
| EFL (mm) | 1219.2 |
| f/number | 6 |
| Magnification Range | 43.54-152.4 |
| Coating | Protected Aluminum (400-2000nm) |
Alignment and Collimation
Once a telescope is assembled, it needs to be aligned and collimated. This is usually done through visual inspection, especially for telescopes which need to be aligned and collimated during every use, such as a type of reflective Newtonian telescope called Dobsonians. There are many methods of visually collimating telescopes and covering all of them would be lengthy. There are, however, plenty of online resources which cover this procedure such as this 2019 article from astonomy.com, this 2011 tutorial from Gary Seronik, and this guide from OZSCOPES. The amateur enthusiast is encouraged to read and understand these procedures before assembling their telescope to assure the best optical performance. The alignment usually revolves around specific features present on various optical elements. For example, one alignment method involves placing a small cross on the middle of the objective mirror to align it to the secondary mirror and then the eyepiece.
Mounting
It was mentioned above that a tripod is necessary to mount the actual telescope assembly. Telescopes should not sit on the ground and a general mounting solution must be made. While Edmund Optics does not offer these mounts, there are several types to consider for mounting the actual telescope assembly.
Alt-Azimuthal Mount
One of the most popular amateur hobbyist mounts is the alt-azimuthal mount. This mount is set on a rotational platform to move the field of view across the sky. This is essentially the horizontal axis adjustment. The telescope tube is mounted on the rotational mount with the ability to point the field of view upwards or downwards, allowing the viewer to see astronomical objects positioned in all sections of the sky. The second portion of the mount allows for vertical, or azimuthal, adjustments.
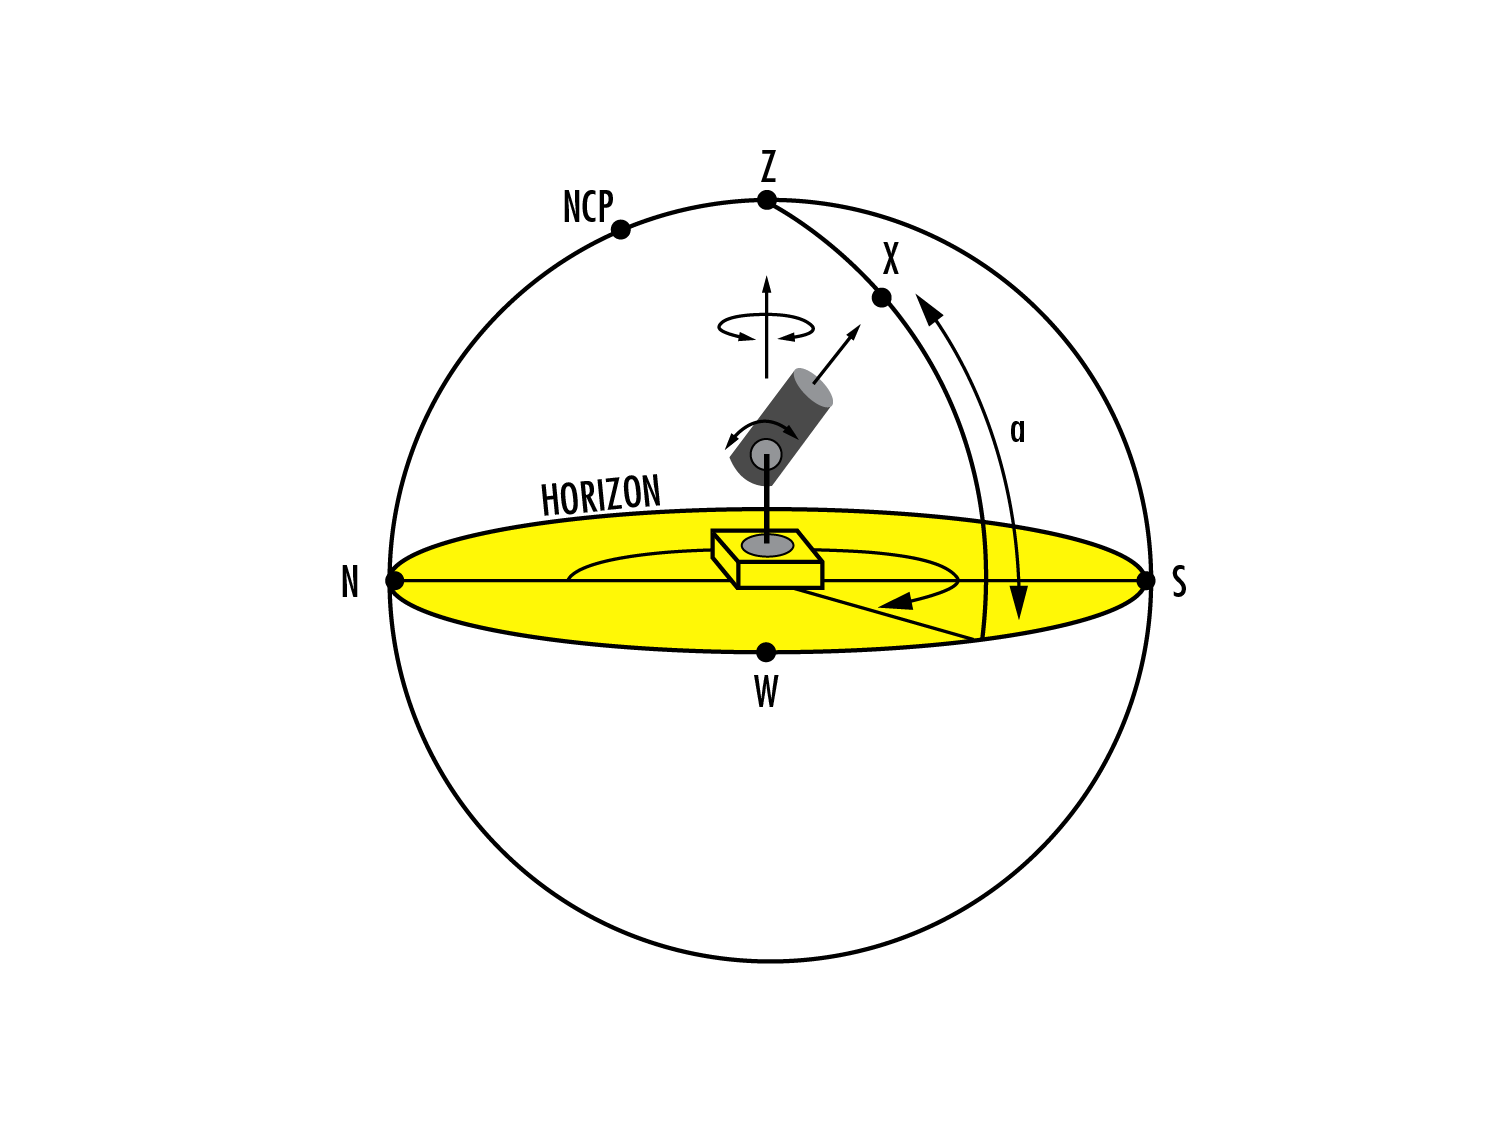
Figure 8: Alt-azimuth mount schematic.
Alt-azimuthal mounts are easy to build and thus tend to be the most popular for hobbyists. Dobsonian telescopes are reflective telescopes placed on an alt-azimuthal mount and are very popular as they are inexpensive, easy to make, and suitable for beginners. The major disadvantage to the alt-azimuthal mount is that the viewer needs to adjust the rotational and azimuthal portions of the mount to follow astronomical activity across the sky.
Fork Mount
Another common mount is the fork mount. This is a two-pronged mount that connects to the telescope on either side of the telescope assembly and is usually surrounded by a tube. This is somewhat like the alt-azimuthal in that one axis rotates vertically and the other axis rotates horizontally. However, the rotational capability of this mount is generally “wedged”. Wedges are used to aim one’s telescope in such a way that rotating the telescope horizontally will continue following the astronomical object that is being viewed. This is done by adjusting the angle of the telescope with reference to the longitudinal position of the viewer. This then allows the viewer to rotate the telescope at an angle that follows the stars across the sky without adjusting height or azimuthal position. The wedge essentially allows the rotation of the telescope to mimic the way the Earth moves so that the telescope automatically follows the path of stars across the sky. The telescope would be mounted between the two “fork prongs” of the mount.
Both fork and alt-azimuthal mounts can be wedged, although it increases the price and it is much easier to wedge a fork mount. In fact, adding a wedge to a homemade alt-azimuthal mount would be incredibly complex. Often, in commercial telescopes, the mounts are wedged fork mounts with “go-to” capabilities which can point to a particular astronomical body by inputting coordinates in the graphical user interface (GUI) and follow it as it goes across the sky. This, however, would be very intricate to build and is therefore not covered in depth here.
Conclusion
Having considered all the above information, it should be possible for a beginner hobbyist to determine the necessary components to build a telescope. The concepts explained here should provide enough information to make an educated decision on the type of telescope to build as well as parts needed. The BoMs should be enough to provide an idea of the optical elements and mounts needed. It may be that the first attempt at building a telescope will not result in optimal performance but learning is, obviously, part of the process and fun of the astronomical viewing hobby.
It is important to note that no single telescope will fulfill all purposes that a beginner wants to achieve. It is very possible and probable that as an amateur becomes more skilled and knowledgeable, they will start looking into several different telescopes for different purposes. This is all part of the pleasure of viewing the astronomical objects present in our universe. The confines of this hobby are as wide as the universe itself!
Table 2 summarizes the key differentiators between the different types of hobbyist telescopes.
Table 2: Summary of telescope building.
| Type | Cost | Imaging Performance | Light Gathering Capability | Portability |
|---|---|---|---|---|
| Reflective | \$ (i.e. \$300-\$700) |
Low-Medium | High | Medium-High |
| Refractive | $$ (i.e: $700-$3000) |
Medium-High | Medium | Low-Medium |
References
- NASA (2021). Image and Video Library. https://images.nasa.gov/
or view regional numbers
QUOTE TOOL
enter stock numbers to begin
Copyright 2025 | Edmund Optics BV, De Maas 22B, 5684 PL Best, The Netherlands
California Consumer Privacy Acts (CCPA): Do Not Sell or Share My Personal Information
California Transparency in Supply Chains Act
This content may include material that has been generated or modified using artificial intelligence (AI).
The FUTURE Depends On Optics®